Showing posts with label crabby namesake. Show all posts

Monday, May 3, 2010

wait a minute!

Ok, so I already made many excuses for the 
mediocrity of my 'hand painting' on the 
dish towel craft. Well, I am proud to say that 
I made some more towels this weekend, for the sake of 
care packages, of course, and I have fine tuned 
the painting.
 Phew! I was really feeling bad about that. 
So, worry not, I will amend the original instructions 
and we can all sleep better tonight. 

First of all, instead of rummaging around in my office for
crochet, I actually went and bought some biggie 
crochets that made me exponentially
 more happy than the first 1/4" crochet.
 
Although, keep in mind if you want to use biggie crochet...
you MUST zig zag the ends considerably before sewing
it down to your towel. Also, heavy drying is no bueno. 
So begins the amending of the original 
smoke I was blowing. 
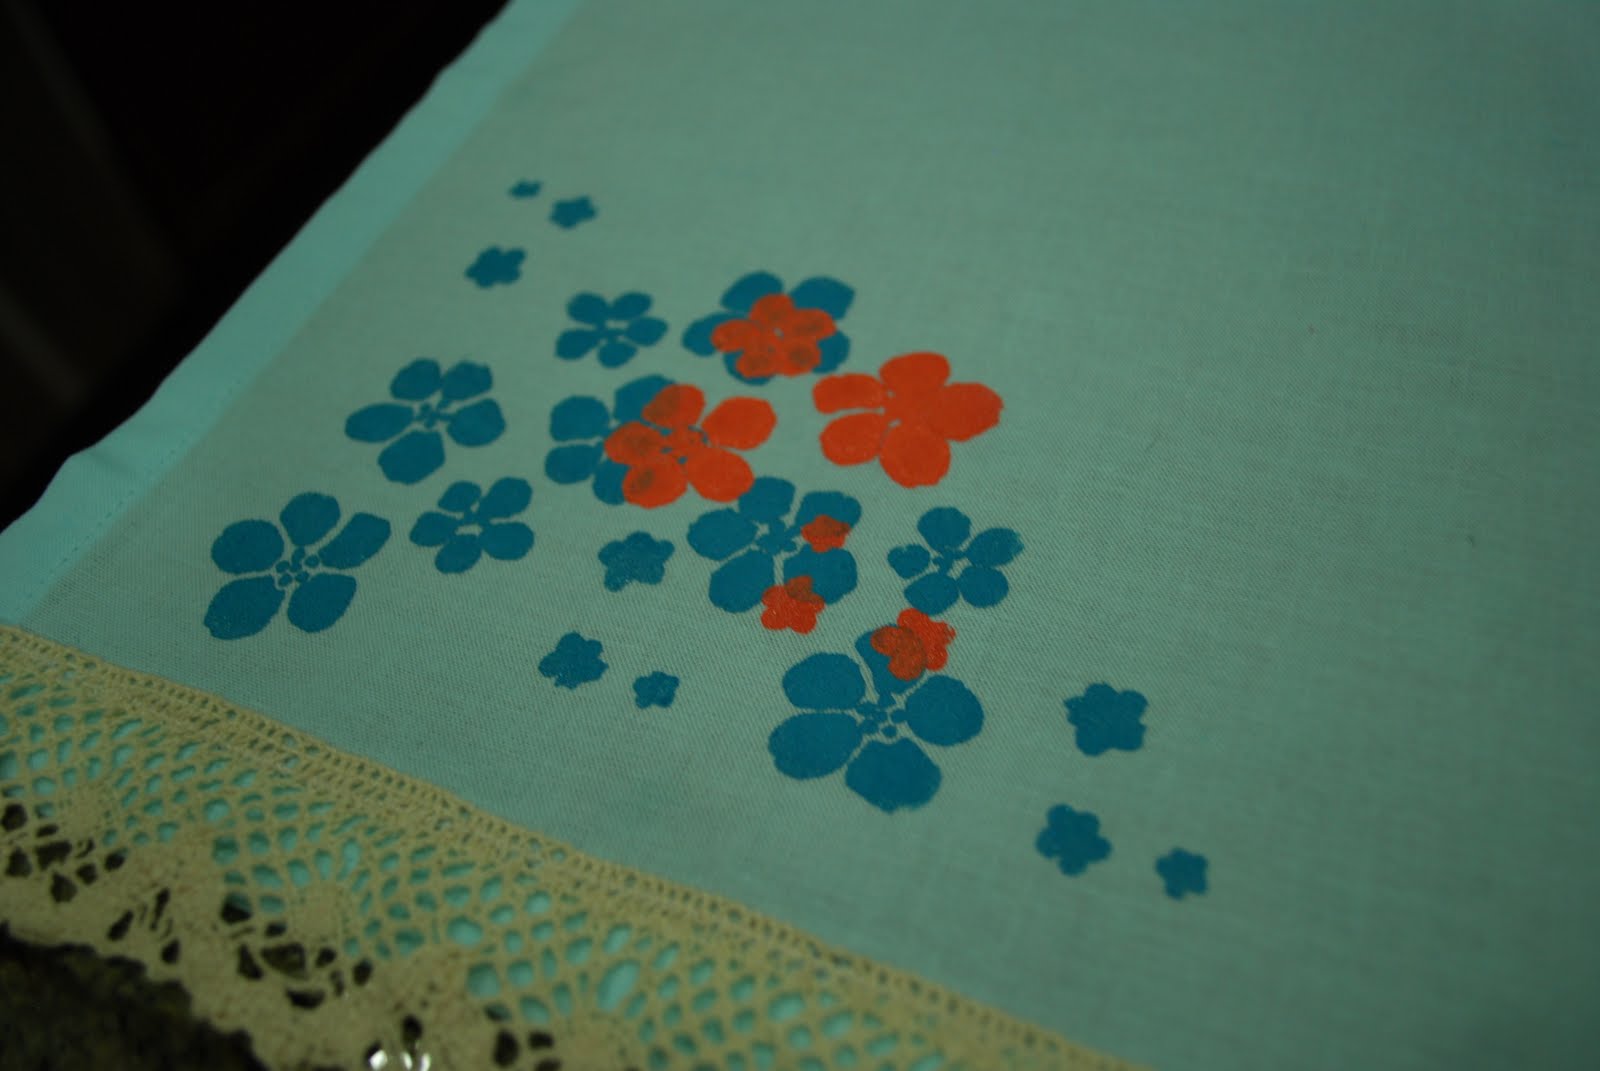
**First of all, I completely lied when 
I said that I used a brush to brush on the paint
 with the stencils. I use the brush with 
the rubber stamps all the time. I was having a midnight 
brain fart. The reason my stencils looked so fab in the first 
place was because I used a black sponge paint brush. 
duh. 
You can see I switched up the colors too.
**AND! I found a way better fabric paint that I was 
very pleased with that dried and brushed on 
so flat and MATTE! We love matte. 
The culprit - tulip 'soft' fabric paint. find it here
The other thing that is so totally great about this 
paint, is that it comes in a four pack of soft
neon colors...orange, pink, blue and green. 
It is like a small miracle when any producer of craft items
actually does it right, so I am very excited about this paint. 
Matte, flat, and soft neons? yes, yes, yes.
 
**Another thing that may be problematic about the
towel tutorial is all of the choices. I think that 
perhaps people don't want choices. They want 
to be directed... and this is why they follow 
a tutorial in the first place(correct me if i'm wrong). 
SO, forget the choices. No more choices for you!
The paint formula that I like is the same as my very
I like a heavy paint job on one side, and a small little touch
on the other... with a small little splash of your 
second color. 
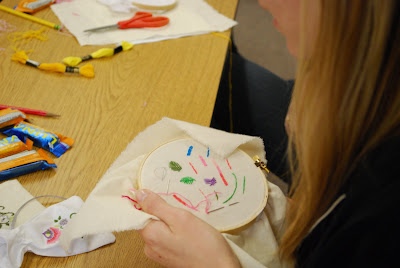
This heavy painted side is where the applique will 
also go. 
Got it??
Of course I could not spread my mediocrity..
so, naturally, the care packages I made feature
beautifully painted towels. Yay!!
Have fun appliqueing!!
Look at this masterpiece drawn on our wall this weekend...
The Joy!

Wednesday, April 28, 2010

Mommy love (super mondo tutorial)

Finally the anthro inspired appliqued kitchen towel
(inspired by mom's day) tutorial. 
voila!
I must admit that I made the second prototype last night
in the wee hours and there are some funky craftsmanship 
moments. Don't worry : I will call your attention to them
even if you don't see them. 
the rest is after the jump...

Friday, April 16, 2010

fancy stuff for mom!!

A friendly reminder of a fabulous 
embroidery/applique/craft class at U.C.S.D. next 
Saturday 4/24. 
We will be making fancy kitchen towels a la
Anthropologie.  Here are some samples made today...
excuse the extreme wrinkles - my poor iron pooped 
out before I could press!!
Sign up here, or email me if you are interested!!
(If you live in San Diego or you LOVE to drive.)
And, not to brag... but, feast your eyes on these
wonderful projects from the Valentines day class!!

Father/Son boxers by SweetB.
Tie by extreme overachiever Micha. 
The  main lesson here is be good to your mom. 

Tuesday, April 13, 2010

Minty

And I am talking about color again.  As usual, I am loving 
the cool minty blue. I picked up this SHEER vintage gem last week
and I must say it in the wrong hands it would be a disaster. 
Luckily, I found her and am continuing to love the soft neons and 
my always fave minty. 
With color in mind, I dusted off this sweet zip pouch tutorial...
though I mixed it up with some soft neon stencils and vintage giant 
ribbon. Fun fun!
Stencils from Stencil 1. Thanks Ame!
There's the mint!! Minty interior. 
And what would the minty blue melamine color be without
yet ANOTHER blue celebration cake appearance..

Happy birthday godmom Mary! and Happy Belated Megan!

Wednesday, March 31, 2010

vintage love!

Some of the most effortless vintage shopping from the week
to get us all inspired!
Beautiful prints..
Pretty art. 
Layers of goodness!
Groovy sleeves. 
Sweet detail. 
Lovely color!
Vintage prints and construction just make it too easy! Amazing!

Sunday, February 7, 2010

Holy Bow!

I have done it. I have recreated the cutest hip purse
and given it a bit of a Jaimee makeover - 
sewn up in hand dyed canvas with floral boho lining
and sweet silver hardware. 
Behold the cuteness! Get yours here... and for a measly 
50 bucks, I will personally sew one up for you!
In the lightweight canvas, this purse is such an awesome
every day carry all. 
Get yours at the Smalltime shop here
Again, I say, let's look alike!!

Tuesday, January 5, 2010

get crabby part two..

Yay to Phoebe for doing the blog embroidery tutorials
at home. Beautiful!

Rasta urchin..

And, her super special extra credit boyfriend-inspired embroidery.

Time for you to get crabby!
This time around we are having two winter classes..

1/30 is another embroidery class.
I am feeling a bathroom towel related craft here..hmm.
I'll get back to you on this.

2/6 is a sewing class for the big Vday. We will
sew boxers and neck ties. Running wild horses boxers anyone?
Fun!

If you are a current or former UC student(or a glutton for punishment),
you can sign up here.
Otherwise, you can shoot me an email or leave a comment.
As usual, if you are very far away or unable to make it,
I will do some online tutorials to get us all in the mood.

Monday, November 23, 2009

Success!

Embroidered success!
Good work team.
See you in January for some new craftiness.
I will update the blog link when the new craft class
details come out.

The 'i've still got 20 minutes at the end of class' pencil case.

Sorry buddy. But the homemade tie dye looked amazing!

Finishing up.

And now for the last step of this darned embroidery.
The last stitch is the 'spiderweb' stitch and what is so
great about it is that it actually involves very little stitching.
Here is where we were at the last time we were
doing this.. one weekend and 6 glasses of wine ago.
You can use whatever colors you want for this stitch.
The pattern calls out for your stem color, dark green,
and the middle knot color.. medium purple.
Start with your dark green color for the base of the web.

So, Bring your needle through the middle of the little star drawing;
you want to be at one of the inside ends of one of the little lines.
Working outward, stitch in each of the lines. Try to make them as
even as possible. The more even the lines are, the easier
things are for you later.

one stitch.

two.


Eventually, you have a whole wheel.. the bones of the web.
Knot off your first color and cut.
Sorry, mine looks a little wonky because I fixed one of my sides
that was too short. Try to disregard the wonkiness.

Now we switch to our Purple thread.
Start by bringing your needle up between two of the stitch lines,
as close to the top as you can get them.

see..

Then, you take your needle and run it under the stitch lines
to the right and the left of your thread, wrapping the right stitch line
with the new thread. If you ever did camp, think God's eye. yumm.

Continue this process by wrapping the needle around the stitch line
to the right of your new loose thread and putting your needle
under that stitch line and the next.

You have just wrapped
another line. Brilliant.
Keep up this process, running the needle under the stitch line
to the right and left of your floss...

Continually push the already wrapped floss up toward the middle
so it is nice and tight together.

In mere minutes, you will have gone all the way around the wheel.
What do you do now? Oh yes, keep wrapping.
And, wrapping.

Eventually, this mother will be the most beautiful God's eye you
have ever seen.

No, you are not done. See that little knot in the upper left corner?
It needs two friends. If you thought you were done knotting,
you were wrong.
Take your trio of purples and get going. Just like the first knots,
you need 4 threads and your bow tying finger.
You will make one knot in each color.

Ok, now you are done. Nice work!

Don't be afraid to hand wash your work when you are done to
get rid of pencil marks. Use a small dab of detergent.
I dry with a warm iron.

Holiday gift time! Make it happen!
Related Posts with Thumbnails