
Finally the anthro inspired appliqued kitchen towel
(inspired by mom's day) tutorial.
voila!


I must admit that I made the second prototype last night
in the wee hours and there are some funky craftsmanship
moments. Don't worry : I will call your attention to them
even if you don't see them.

the rest is after the jump...
And, because I like drawing dorky pictures, here are the notions
you need for this proj... quite a lot, I must say.

So, we have:
*1 yard of cotton drill cloth. Something light weight or
'canvas weight'.
I always use drill cloth and muslin for projects, as they mostly come
in 'natural' color and I love how yellow and vintage-y they are
after you dye them.
Or, you can find a heavy canvas weight woven fabric in white.
Which is actually what I did in this case, since I was trying to be
fancy for my class participants.
*1/4 yard lightweight fusible pellon. (facing)
*1/4 yard yard lightweight printed woven in floral or any
print of your liking(for the applique).
*crochet for the border.... any size you desire. Again, I prefer
'natural' color so I can dye it up. I used 1/4" wide.
*crochet or ribbon or twill tape for the inside counter hook..
either 1/4" or 1/2" in width. I used the same as my border.
*RIT dye... color of your choice. Or, any fabric dye that you trust.
*Fabric paint(the puffy kind). Don't be scared, we aren't puffy painting
anything. Although, my painting performance last night was
lackluster.
*Paint brush... one with a nice packed in square head. No loosey gooseys.
*Stencil or stamp of your choice... something floral and sweet.
I get my stencils from Stencil 1and my rubber stamps from
The Mayberry Sparrow. And, of course, you can find them at Micheal's
or some like store.
*Basic sewing notions : a machine(duh!), thread, pins, scissors,
measuring tape.
*Basic embroidery notions : embroidery ring, needles, floss.
*AND, an iron. Trés important.
In preparation : print out this little drawing.
You will use this for your appliques.


Then, cut or rip fabric to the size 29" high and 21 1/2" wide.
Press sides and top of piece down 1/2". Then, you will fold them
another half and press.


Press the sides first and then the top and bottom.
Fold the top and bottom corners in, like so :

At one side of the top... either left or right, you will pin in
a 3 1/2" long piece of crochet or ribbon for a towel hang.

Sew time! Sew at the 1/2" mark... your stitch will end up at the edge
of the fold. Yay for cleanly ironed folds.

At all corners you will start from point and sew down the middle
and then continue onto the fold.
A finished corner...

The finished towel hook. fancy!

Next sew the crochet to the front of the towel.
Clearly, you want it dangling from the bottom, and I sewed my on
so the edge of the crochet was even with the bottom seam.
My first sample had double rows of crochet. Like I said, do your own thing
here. Keep in mind, though, that my next step is throwing the
whole thing in a dye vat. So, if you want your crochet to be contrasting
color from your towel, then wait until after you dye to sew on
the crochet.


After the crochet, I threw the whole towel in. Into the washer
with my rit dye, some detergent, and salt to set the dye.
Make sure you use super hot heat. I wanted this guy to be
a little more minty than the last one... so I used less dye.
I used RIT dye 'teal' color.

Once you wash and dry and press...
It's time to lay down a little background art.
Again, you can use either stencils or stamps. I find that brushes
are better for both than sponges. For stamps, just brush the
fabric paint right onto the stamp and stamp away.
First, I squirt the paint into a small bowl to make using the
brush easier.


As far as color goes, I am clearly obsessing about this palette.
I like to layer a couple of colors, usually one that is a like tone of the
fabric color and then another color on top for extra goodness.
Here, I used white and floro pink.

Easy peezey - just brush it on. Make a nice background story.

This time I did a more consistent background across the
whole towel. Last time, I just painted the corners.
I thought that if I painted the whole thing, I could place
my applique birdies right in the middle so I could fold
my kitchen towel and they would be front and center. More on
those ramblings later.
**Here is where I excessively apologize for my slopptastic
art painting. It got a little late and I got a little desperate.
Don't fear, Iwill show you my perfectly good original art performance
and you will see all will be ok.

Then, I layered the pink over. Again - I'm sorry!!

See, look! Last times was TOTALLY normal.
Just go slow and slowly dab and work before midnight.

Too, this time I mellowed out the pink a bit with the white.

My full background...

Last samples cutesy corners...( and double crochet - clearly the second row
of crochet did not go through the dye. It was sewn on post dye.)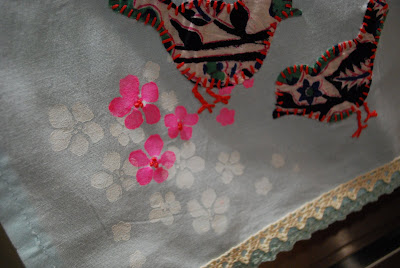


Applique time!
So, take your print outs, your fusible pellon and get tracing!!
Note that one side of your pellon is bumpy. This is the side
that will fuse to the fabric. So, if you want your birdies to appear as they
are on the paper, draw on the rough/bumpy/fusing side.
Otherwise, draw on the smooth side for the reverse pic.
Either way it is cute and the choice is up to you.


Once you trace the birdies, clip around them and iron them, on low,
to the 'wrong' or inside of your floral or printed woven fabric.
You will not be able to trace the birdy feet. You will have to eyeball them
later. Keep your print out!

After you fuse them to the fabric, cut them out.


Next, place them where you desire on your towel.
This time, I desired to put them in the middle for my fancy folding.
Oh yes, I desired.

Next you will stitch them down with a simple blanket stitch.
I always use DMC floss, and in this case, I used
all 6 threads of the floss to make a more dramatic effect.
Super dramatic. Right? ha. 

The color is up to you!! Too many choices, I know.


And the back will look like this. hee.
Once you are done blanket stitching the appliques down,
use your paper to split stitch the birdy feet.
If you need help with your stitches, go here. 

On the original sample, which, let's be honest,
clearly seems superior at this point,
I added some french knot flare to the middle of the pink flowers
for a little more umph.
For french knot help... look here.

Towels, plural.
You are done. Repeat. 

The advantage of doing your applique in the middle
of the towel - the fancy fold.


Ok! Get to it. Have fun!!


Super cute! Well done lady!
ReplyDeleteI can't wait to do this project! I've always loved your towels ... And now my house will have some too! There is some great silk fabric from Bangladesh coming your way ... Can't wait to see what you're going to make next
ReplyDeleteSister.
CAN'T WAIT to start this project!!! I was lucky enough to see these in person last night and LOVE! Thanks again for helping me with my sewing machine!!!
ReplyDeleteby brain can't even handle the list of notions.. much less my pocket book. someone should open a place like gymboree, but for crafters, that we can just go and play in and everything we need will be there for us to use.. instead of having to go to the dreaded michael's and spend $30 everytime we want to do a new project or try our hand at, say, embroidery. ugh!
ReplyDeletebeautifull. congrats!
ReplyDelete